Web3 Onboarding Tools: Top Picks for 2025 Startups
For any crypto app, onboarding is the conversion moment. Whether you’re building an NFT marketplace, DeFi dashboard, or embedded payment flow, how users first connect determines whether they ever come back.
That’s why choosing the right Web3 onboarding tool is a key infrastructure decision, especially for startups moving fast in 2025.
In this guide, we’ll compare the top tools on the market and show how Reown AppKit leads on speed, flexibility, and UX that just works.
What Are Web3 Onboarding Tools?
Web3 onboarding tools help users go from zero to onchain: logging in, connecting wallets, handling keys, and making their first transaction, all without friction.
Great tools should feel invisible. The best ones do three things:
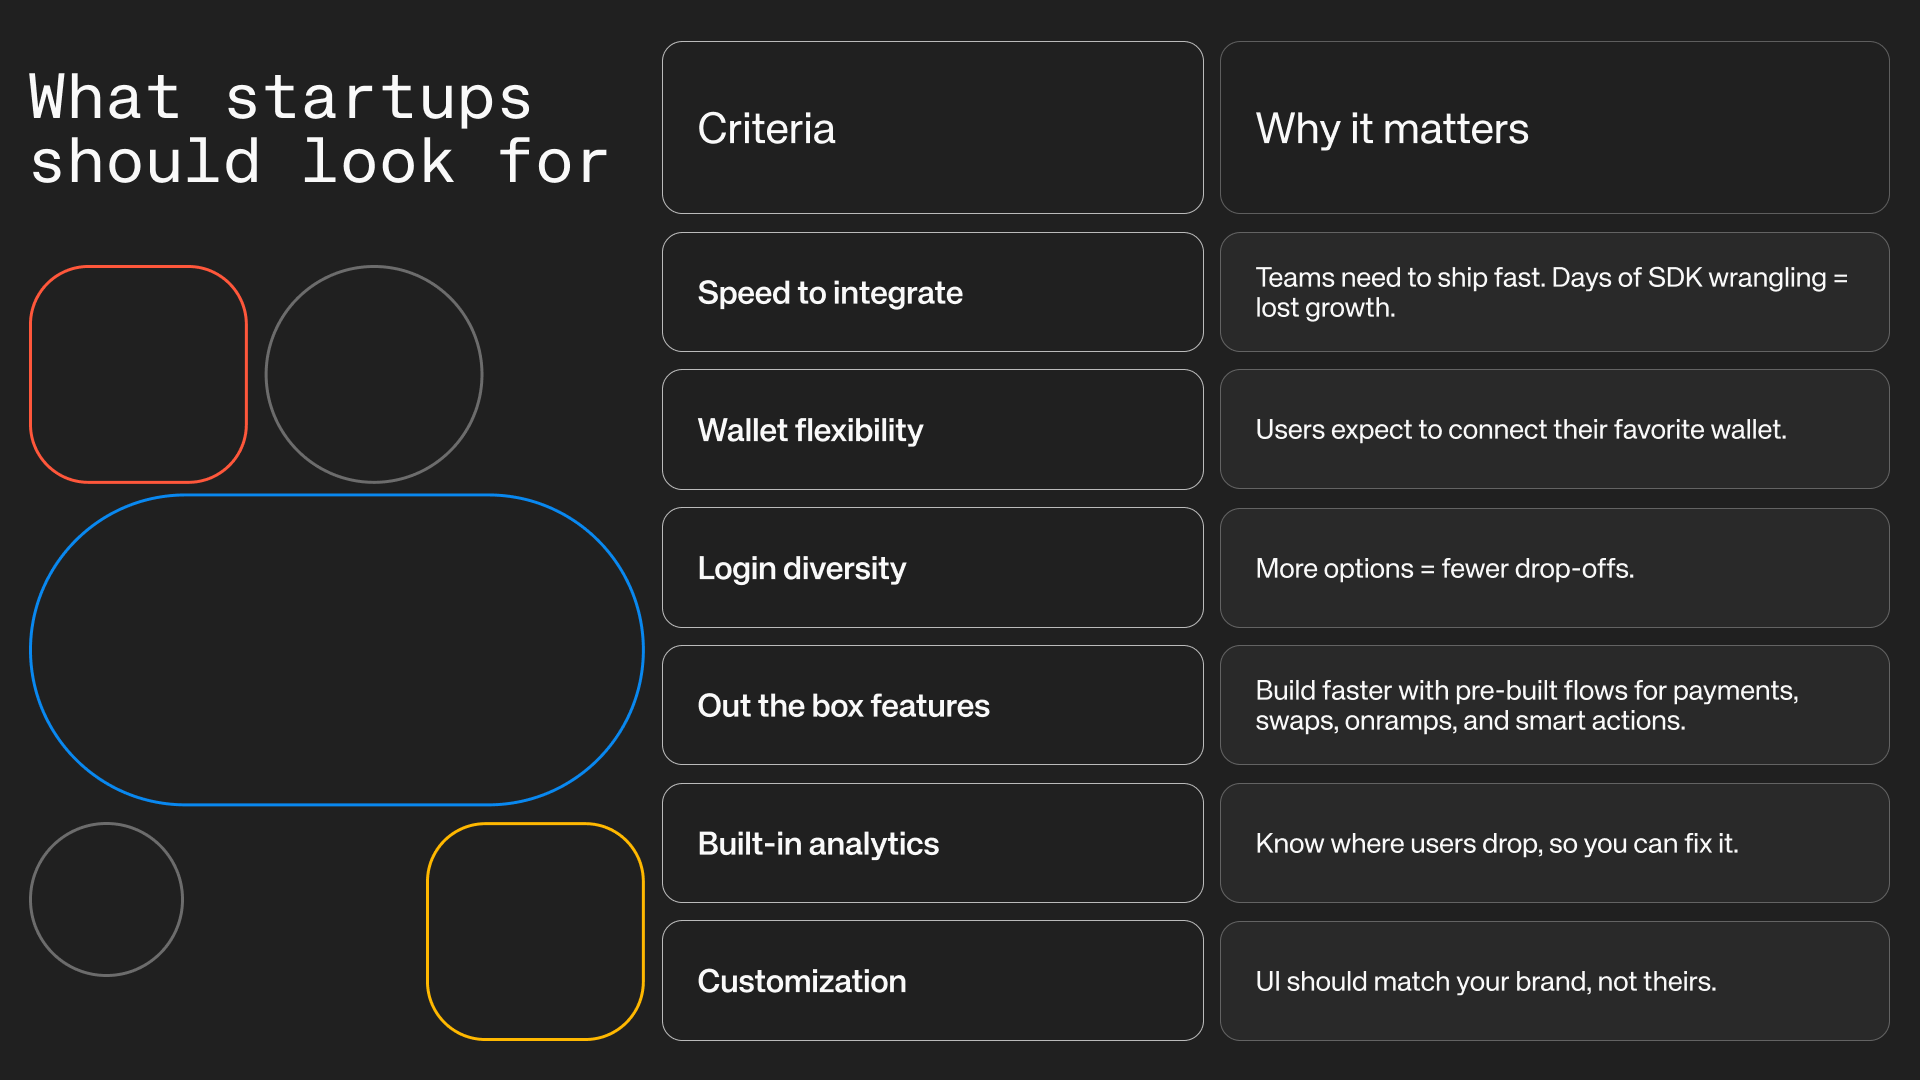
- Let users log in however they want (wallet, email, social).
- Handle wallet logic behind the scenes.
- Give builders full control and data to optimize the experience.
What Startups Should Look For:
2025 Comparison: Top Web3 Onboarding SDKs
Here’s how the leading onboarding tools stack up for startups building in 2025:
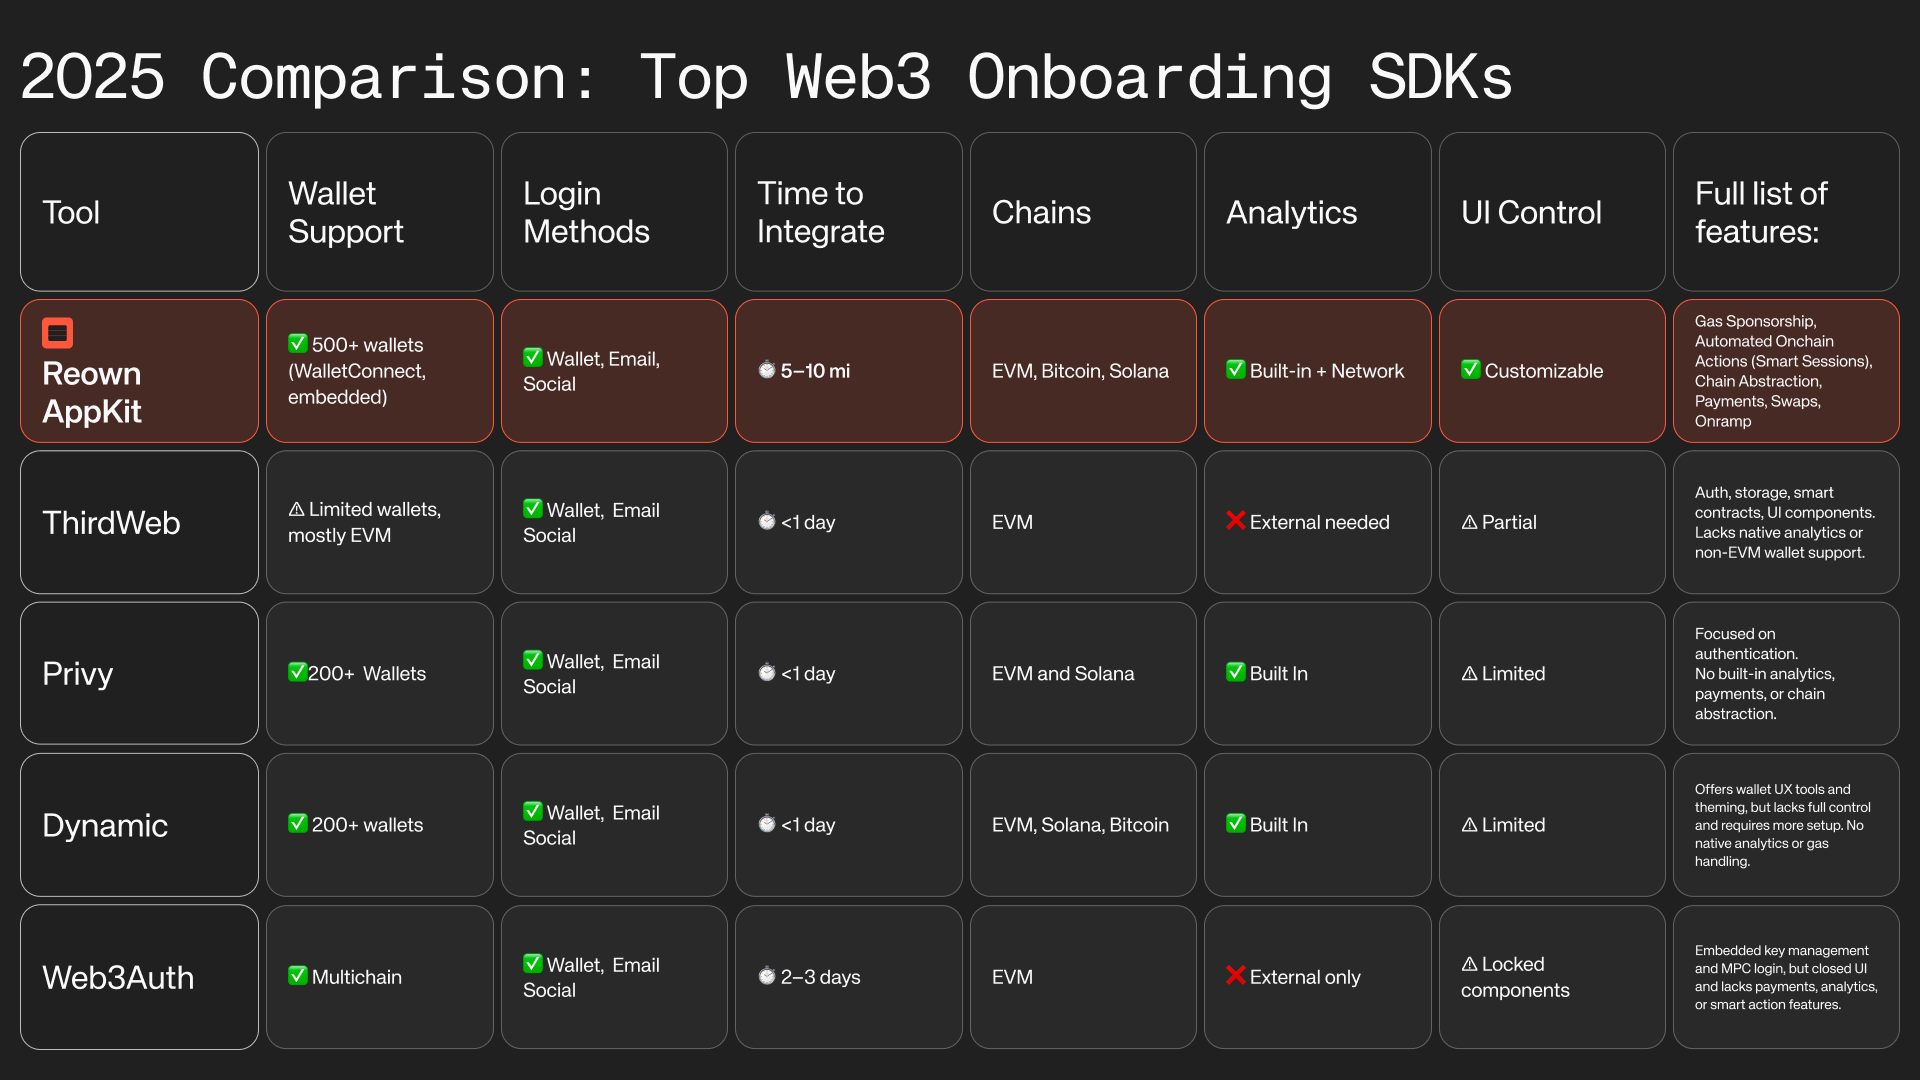
Reown AppKit is designed to minimize time spent building and create faster paths to user adoption.
Why Reown AppKit Is Built for Startup Speed
Reown AppKit is the fastest way to get a crypto app from prototype to production. With just a few lines of code, you unlock a complete onboarding engine:
Wallet + Email + Social login
Sign in with what users already have, no gating.
500+ wallets supported
Full WalletConnect integration.
Built-in analytics
Track conversion, bounce rate, and session flow out of the box.
Fully brandable
You own the UI. No forced styles, domains, or lock-in.
Payments, swaps, and onramps included
Let users buy, swap, and pay directly in your app. No app switching, no lost conversions.
Pay with Exchange
New: Let users pay straight from Binance or Coinbase without leaving the checkout flow or sharing credentials.
Quick Start: Add Reown AppKit in minutes
This guide walks you through setting up AppKit with EVM, Solana, and Bitcoin.
We’ll use Next.js in the tutorial, but you can follow along with any framework that supports AppKit.
AppKit is available on eight frameworks, including React, Next.js, Vue, JavaScript, React Native, Flutter, Android, iOS, and Unity.
Install AppKit
You need to install AppKit and other dependencies that we need for our app to function as expected.
npm install @reown/appkit @reown/appkit-adapter-wagmi @reown/appkit-adapter-bitcoin @reown/appkit-adapter-solana wagmi @solana/wallet-adapter-wallets @tanstack/react-query reactYou can also use other package managers such as yarn, bun, pnpm, etc.
Configure AppKit
On the root level of your code directory, create a new folder named "config" and within that folder, create a new code file named "config/index.tsx". Now, paste the code snippet shared below inside the code file, i.e., "config/index.tsx".
iimport { cookieStorage, createStorage, http } from '@wagmi/core'
import { WagmiAdapter } from '@reown/appkit-adapter-wagmi'
import { mainnet, arbitrum, solana, bitcoin} from '@reown/appkit/networks'

// Get projectId from https://cloud.reown.com
export const projectId = process.env.NEXT_PUBLIC_PROJECT_ID

if (!projectId) {
  throw new Error('Project ID is not defined')
}

// Lazy imports for client-side adapters
let SolanaAdapter: any, BitcoinAdapter: any, PhantomWalletAdapter: any, SolflareWalletAdapter: any;

if (typeof window !== 'undefined') {
  // Dynamically import browser-only modules
  SolanaAdapter = require('@reown/appkit-adapter-solana/react').SolanaAdapter;
  BitcoinAdapter = require('@reown/appkit-adapter-bitcoin').BitcoinAdapter;
  PhantomWalletAdapter = require('@solana/wallet-adapter-wallets').PhantomWalletAdapter;
  SolflareWalletAdapter = require('@solana/wallet-adapter-wallets').SolflareWalletAdapter;
}

export const networks = [mainnet, arbitrum]

// Set up the Wagmi Adapter (Config)
export const wagmiAdapter = new WagmiAdapter({
  storage: createStorage({
    storage: cookieStorage,
  }),
  ssr: false, // Disable SSR for wagmiAdapter
  networks,
  projectId,
});

// Safely initialize Solana and Bitcoin adapters (client-side only)
export const solanaWeb3JsAdapter =
  typeof window !== 'undefined'
    ? new SolanaAdapter({
        wallets: [new PhantomWalletAdapter(), new SolflareWalletAdapter()],
      })
    : undefined;

export const bitcoinAdapter =
  typeof window !== 'undefined'
    ? new BitcoinAdapter({
        networks: [bitcoin],
        projectId,
      })
    : undefined;

export const config = wagmiAdapter.wagmiConfig;
Create your modal
Now, we need to create a context provider to wrap our application in and initialize AppKit.
use client'

import { wagmiAdapter, projectId, solanaWeb3JsAdapter, bitcoinAdapter } from '@/config'
import { createAppKit } from '@reown/appkit/react'
import { mainnet, arbitrum, solana, bitcoin} from '@reown/appkit/networks'

import { QueryClient, QueryClientProvider } from '@tanstack/react-query'
import React, { type ReactNode } from 'react'
import { cookieToInitialState, WagmiProvider, type Config } from 'wagmi'

// Set up queryClient
const queryClient = new QueryClient()

if (!projectId) {
  throw new Error('Project ID is not defined')
}

// Set up metadata
const metadata = { //this is optional
  name: "appkit-example",
  description: "AppKit Example - Multichain",
  url: "https://reown-appkit-multichain.vercel.app", // origin must match your domain & subdomain
  icons: ["https://avatars.githubusercontent.com/u/179229932"]
}

// Create the modal
const modal = createAppKit({
  adapters: [wagmiAdapter,solanaWeb3JsAdapter, bitcoinAdapter].filter(Boolean),
  projectId,
  networks: [mainnet, arbitrum, solana, bitcoin],
  defaultNetwork: mainnet,
  metadata: metadata,
  features: {
    analytics: true, // Optional - defaults to your Cloud configuration
    socials: ['google', 'x', 'github', 'discord', 'apple', 'facebook', 'farcaster'],
  },
  themeMode: 'light'
})

function ContextProvider({ children, cookies }: { children: ReactNode; cookies: string | null }) {
  const initialState = cookieToInitialState(wagmiAdapter.wagmiConfig as Config, cookies)

  return (
    <WagmiProvider config={wagmiAdapter.wagmiConfig as Config} initialState={initialState}>
      <QueryClientProvider client={queryClient}>{children}</QueryClientProvider>
    </WagmiProvider>
  )
}

export default ContextProvider
And that’s it! You have now learned how to create a simple Web3 app using AppKit that allows users to connect their wallet and interact with multiple EVM networks, Solana, and Bitcoin.
Get started with AppKit Setup guide
Or play around with AppKit Live demo
Final Thoughts: The Right Tool Gives You Time Back
Every startup has a roadmap. If your onboarding tool is slowing you down, you're burning time and users.
AppKit was built for builders, fast integration, no hacks, full control, and a better user experience across devices, wallets, and login types.
Launch faster. Drop fewer users. Grow smarter.